What is ISO?
ISO measures the camera’s sensitivity to light. When ISO is changed, its light sensitivity is also changed. This is one of the main three ways to control exposure, or basically the only one if you are a videographer (Shutter speed and aperture are usually used stylistically).
How do you change it?
If you have a camera where you can change the ISO I would first recommend looking for the native ISO (unamplified sensor), you can find it by looking up your camera or going to its manual. Using the native ISO of your camera will give you the clearest image possible for that device.
Unfortunately not all camera companies provide their native ISO to the public. If this is your situation, I recommend dropping your camera’s ISO to the lowest setting for the best image quality.
What do the numbers mean?
The numbers represent your sensor’s sensitivity to light. A lower ISO number such as 100, will be less sensitive to light and a higher ISO of 1200 will be more sensitive to light.
How does it affect the image?
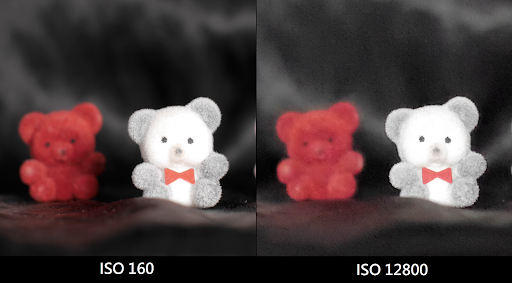
ISO makes an image brighter especially in dark circumstances; however, this does not come without a price because ISO also changes the dynamic range therefore you can lose image quality.
The loss of image quality is usually noticeable in what is called digital noise. Digital noise will create a snowy texture over your image preventing you from getting the sharpest image possible. This isn’t to say you can’t use it artistically just be aware.
How does it affect the Viewer?
ISO is still not used universally for Style therefore there’s not much of how it affects the viewer and if used correctly it might even enhance the story you are trying to tell. A good instance of a movie with a high ISO for style is the Disaster Artist.
Project
Purpose: The purpose of this project is to teach the basics of Camera ISO and how it affects an image. As an added bonus, you will get familiar with your camera’s personal limits.
Requirements:
- A camera with adjustable ISO.
- A Still Subject.
- Lights (any kind).
Task
- Pick a still subject to photograph and video (make sure the environment is consistent).
- Set the camera to the lowest ISO number
- Take a photo of the subject in low light (the photo will be dark).
- Making sure the environment is staying exactly the same (lighting, positioning everything!) take a photo at every ISO stop the camera provides.
- Once finished, drop the ISO back to the lowest number.
- Light the object well.
- Snap some photos.
- Upload the photos and label the ISO (Forget it? Right click the image, click properties and then go to details, the ISO is listed!).
- Compare the photos (zoom in, look for artifacts on higher ISO settings).
- Now, do the same with video except this time be careful to vocalize which ISO is being used, so it is not forgotten in editing later.